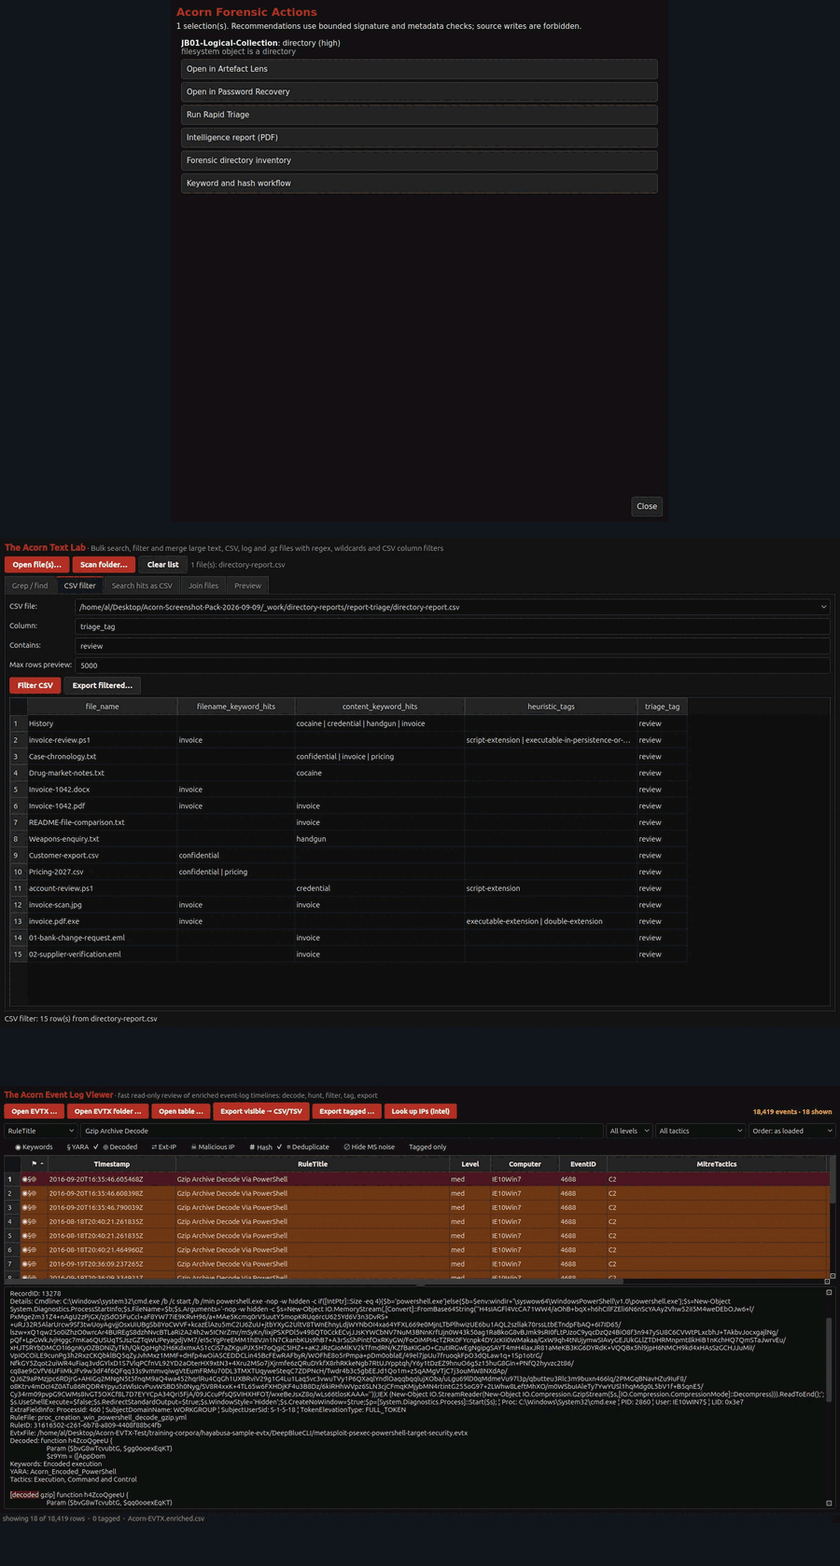
01 / A prepared forensic workspace
One connected workspace
Keep source records, case review and focused tools together. Spend less time moving between unrelated utilities.
Browse the applications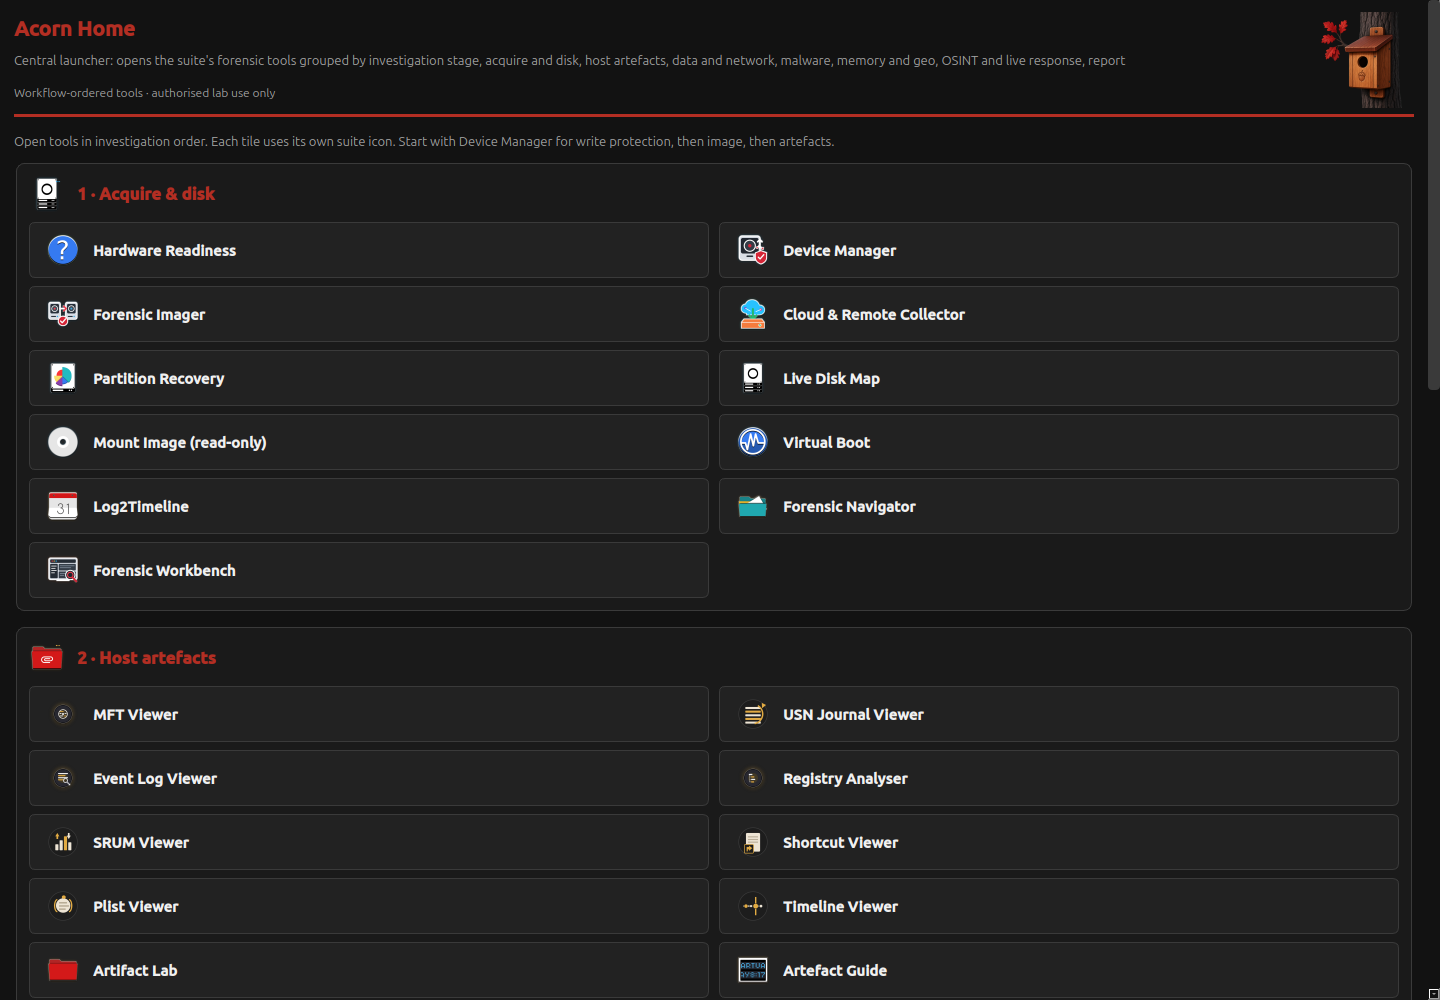 Enlarge this view
 Designed in the UK
THE ACORN / FORENSIC OPERATING SYSTEM
The Acorn combines a forensic operating system, focused applications and a portable workstation. Protect and copy evidence, recover files, trace activity and prepare reports in the laboratory, office or field.
Local evidence analysis runs on the workstation. Remote sessions and cloud collection need network access.
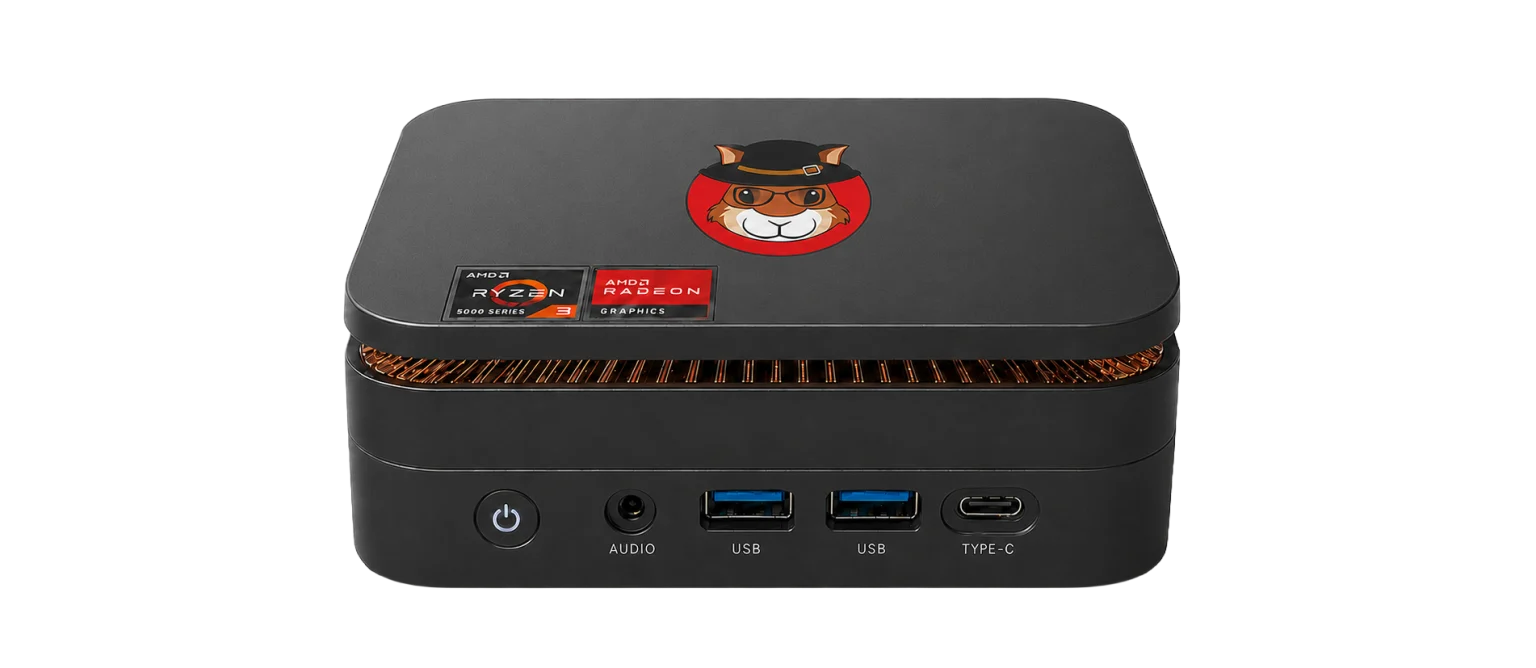
Images show earlier hardware. Final components, ports and compatibility remain subject to confirmation.
A forensic multi-tool
A portable Linux workspace for the laboratory, office and field.
Image a disk, recover a file or inspect its records in one prepared workspace.
Use focused applications for a specific question, then return to the case view. Keep specialist tools and your own scripts where the examination needs them.
Why a forensic operating system
Choose an advantage to see how it fits an examination.
01 / A prepared forensic workspace
Keep source records, case review and focused tools together. Spend less time moving between unrelated utilities.
Browse the applicationsEnlarge this view02 / A prepared forensic workspace
Inspect connected media and use integrated write-blocking controls within a planned acquisition workflow. External hardware blockers can be used where your policy requires them.
Explore device protection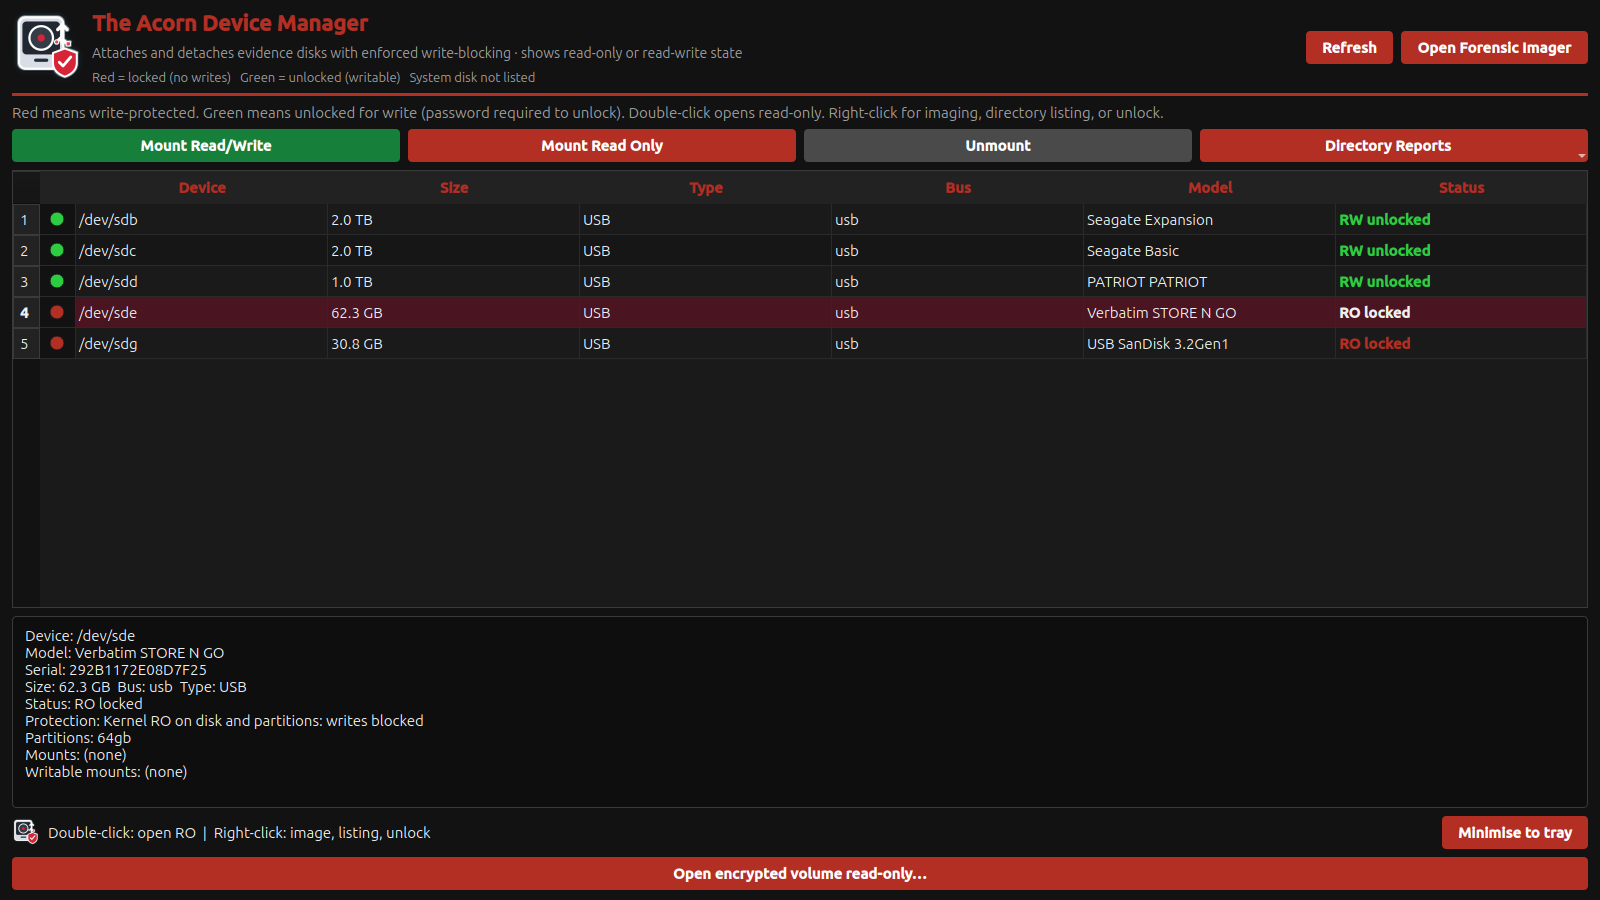 Enlarge this view
03 / A prepared forensic workspace
Use a portable workstation at the bench or on site. Plan suitable power, storage and a safe place to handle the evidence.
Explore the portable workstation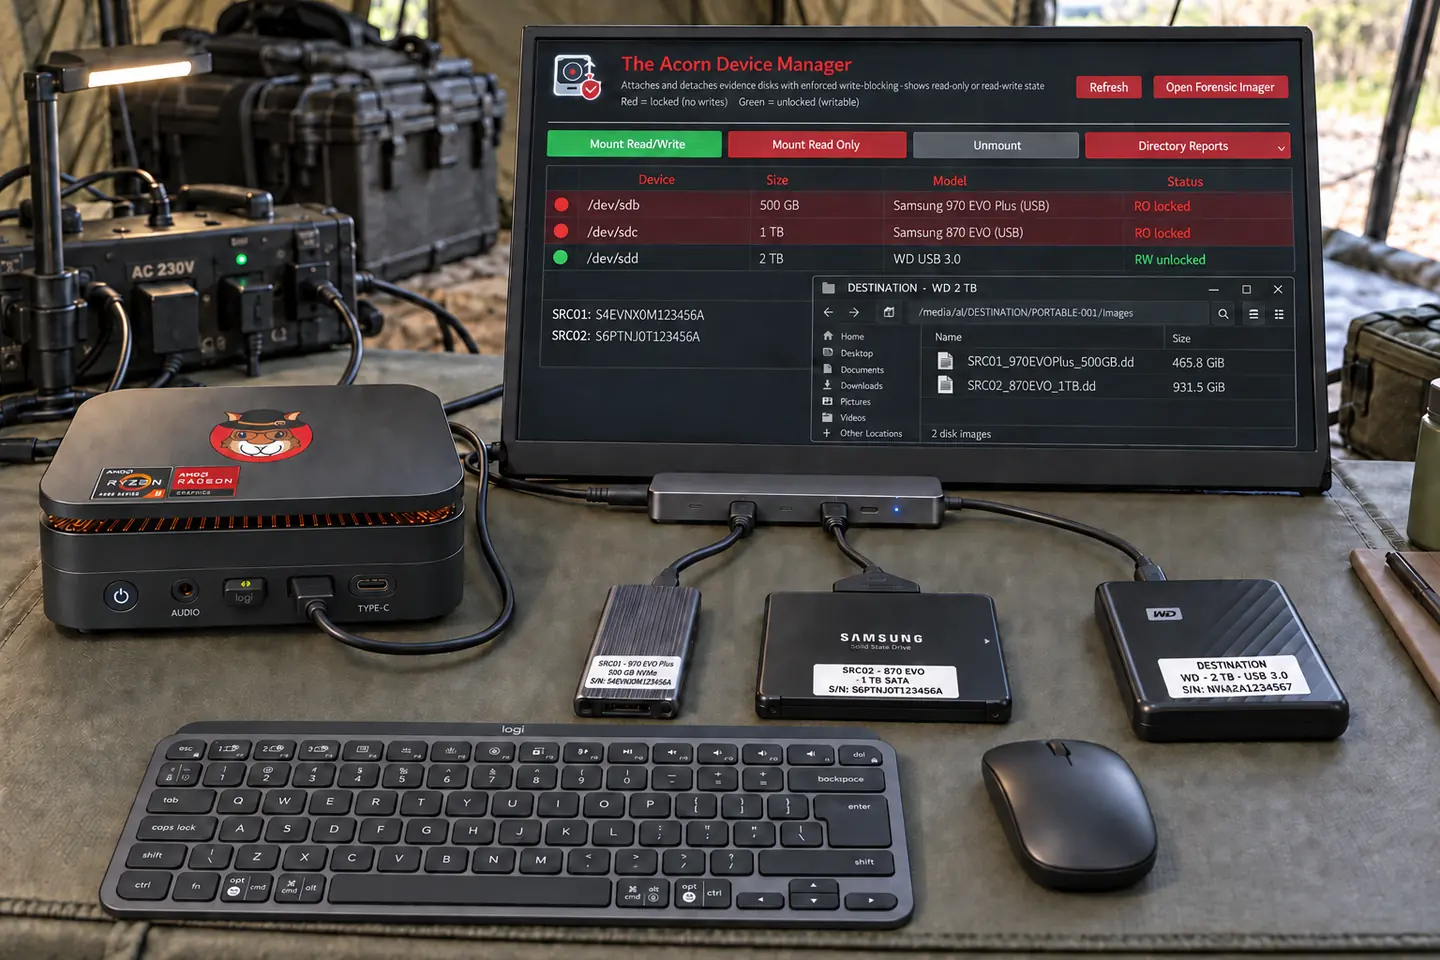 Enlarge this view
04 / A prepared forensic workspace
Review local evidence without relying on a live cloud service. Online lookups, updates and remote collection need a separate, authorised connection.
Check capabilities and limits Enlarge this view
05 / A prepared forensic workspace
Start with the case question. Collect what is needed, review the relevant records and widen the work when the evidence calls for it.
Explore the Forensic Workbench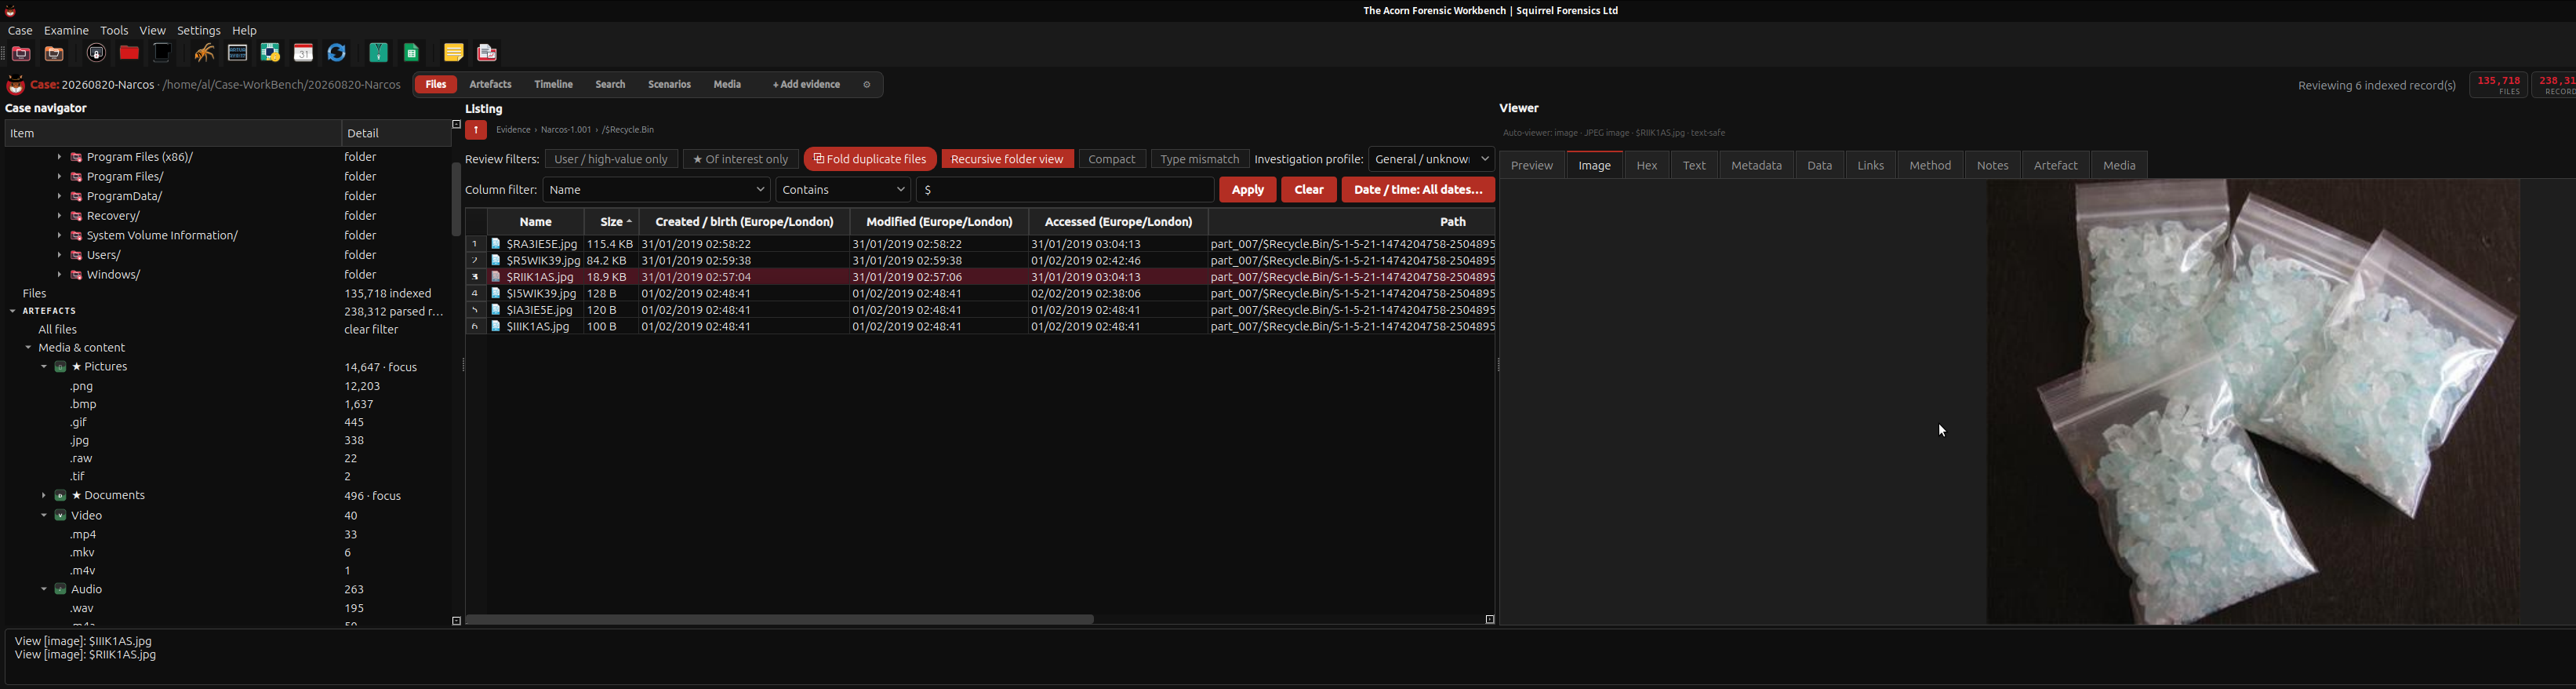 Enlarge this view
06 / A prepared forensic workspace
Scope the workstation, applications and support around the work you need to do. Reuse suitable equipment and keep specialist software where it adds value.
Discuss your requirementsEnlarge this viewChoose standard imaging, resumable copying or a focused recovery route. Bad-sector mapping and tools such as OpenSuperClone can support a failing-disk workflow. Partition recovery and fragmented-file carving address different problems, so start with the condition of the source.
Reuse keywords, file hashes, pattern rules and review leads across the investigation. Focused viewers help you work through large tables, event logs and timelines without losing the source behind an entry.
Guided workflows bring memory review, Windows file records, event logs and timeline processing closer to both new and experienced examiners. Graphical tools and the terminal let students learn the underlying method, not just follow an output.
Add open-source utilities or write a parser for an unusual case. Test custom scripts before casework and keep case data within your approved environment. Standard outputs help you retain your work without depending on one vendor.
We plan to provide regular fixes, tool updates, detection content and workflow improvements. We will confirm the release schedule before launch.
Protect. Image. Unlock. Recover.
Kernel-level write blocking and forensic imaging are built into Device Manager and Forensic Imager. Work with encrypted volumes, recover lost partitions and image faulty disks.
Non-system drives start read-only at the Linux kernel level. Device Manager protects evidence disks and their partitions, blocking writes to the source.
Explore Device Manager →Inspect device identity and protection state, open a source read-only, then send it straight to Forensic Imager. Output media is managed separately from protected evidence.
Launch acquisition from Device Manager or Forensic Imager. Create E01 or RAW images, record acquisition hashes and save the image and logs to separate storage.
Explore Forensic Imager →Choose physical or logical acquisition. The imaging interface brings source, destination, case details and hash settings together, with focused routes for healthy media and faulty-disk recovery.
Open BitLocker, LUKS and VeraCrypt/TrueCrypt volumes read-only using a password, recovery key or keyfile. The mounting tools are built into Forensic Imager.
Explore read-only mounting →Select the encrypted partition or container and supply its credentials. Browse the unlocked files through a read-only view while keeping the source protected.
Scan for lost or deleted partitions from Forensic Imager's built-in recovery tool. Browse the recovered volume and extract selected files to a separate destination.
Explore Partition Recovery →The scanner locates volume structures and opens them through a read-only view. Export a recovered partition or selected files while leaving the original partition table unchanged.
Imager checks SMART disk-health data and flags signs of failing media. Faulty-disk mode captures readable sectors first and records progress and problem areas in a recovery map. Resume from the saved map, control retry passes and follow progress in Live Disk Map.
Core forensic apps
These nine core apps cover device checks, imaging, recovery and review. Filter by task, open a card to see an example, or browse all 49 application guides.
9 core apps
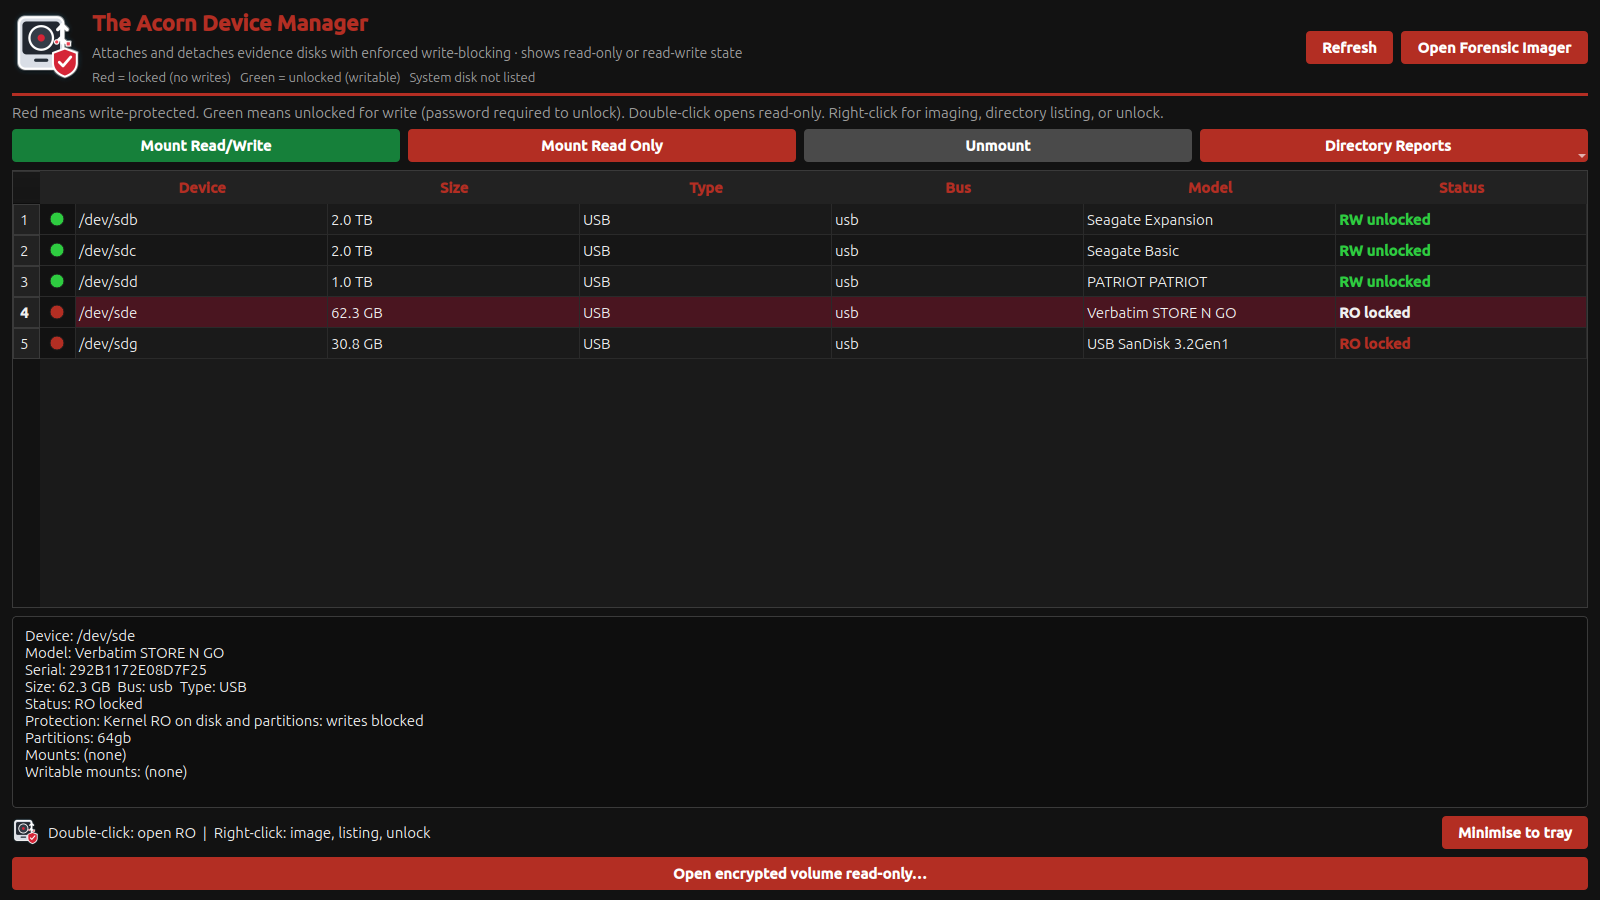
Check the connected device, its partitions and any mounts before choosing an action. The selected USB device is reported as read-only. That state is useful context, not independent proof that every write attempt would be blocked.
Native device-state inspection
 View full screen
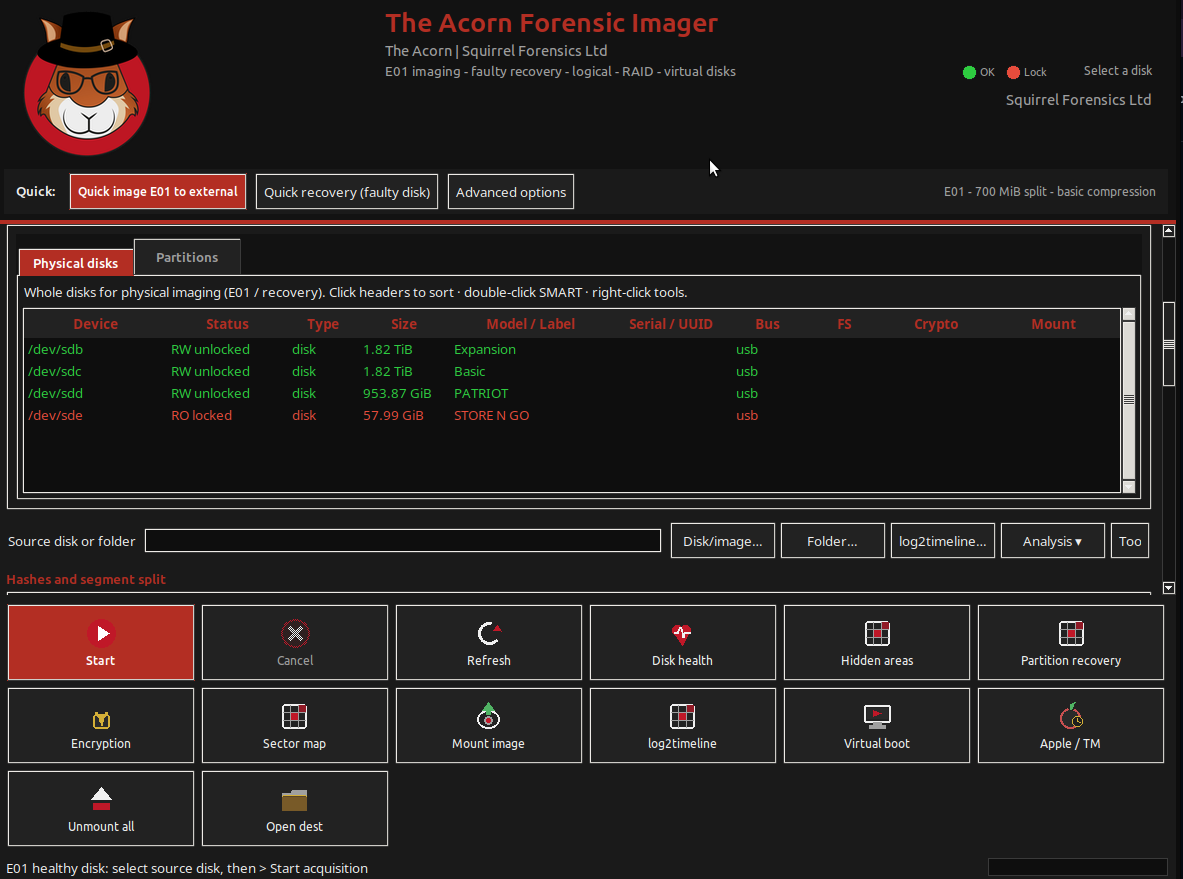
Check the disk inventory, select the source and choose a separate destination. The Imager screen brings those settings together before acquisition. The screenshot shows setup, not a completed imaging job.
Acquisition setup shown
 View full screen
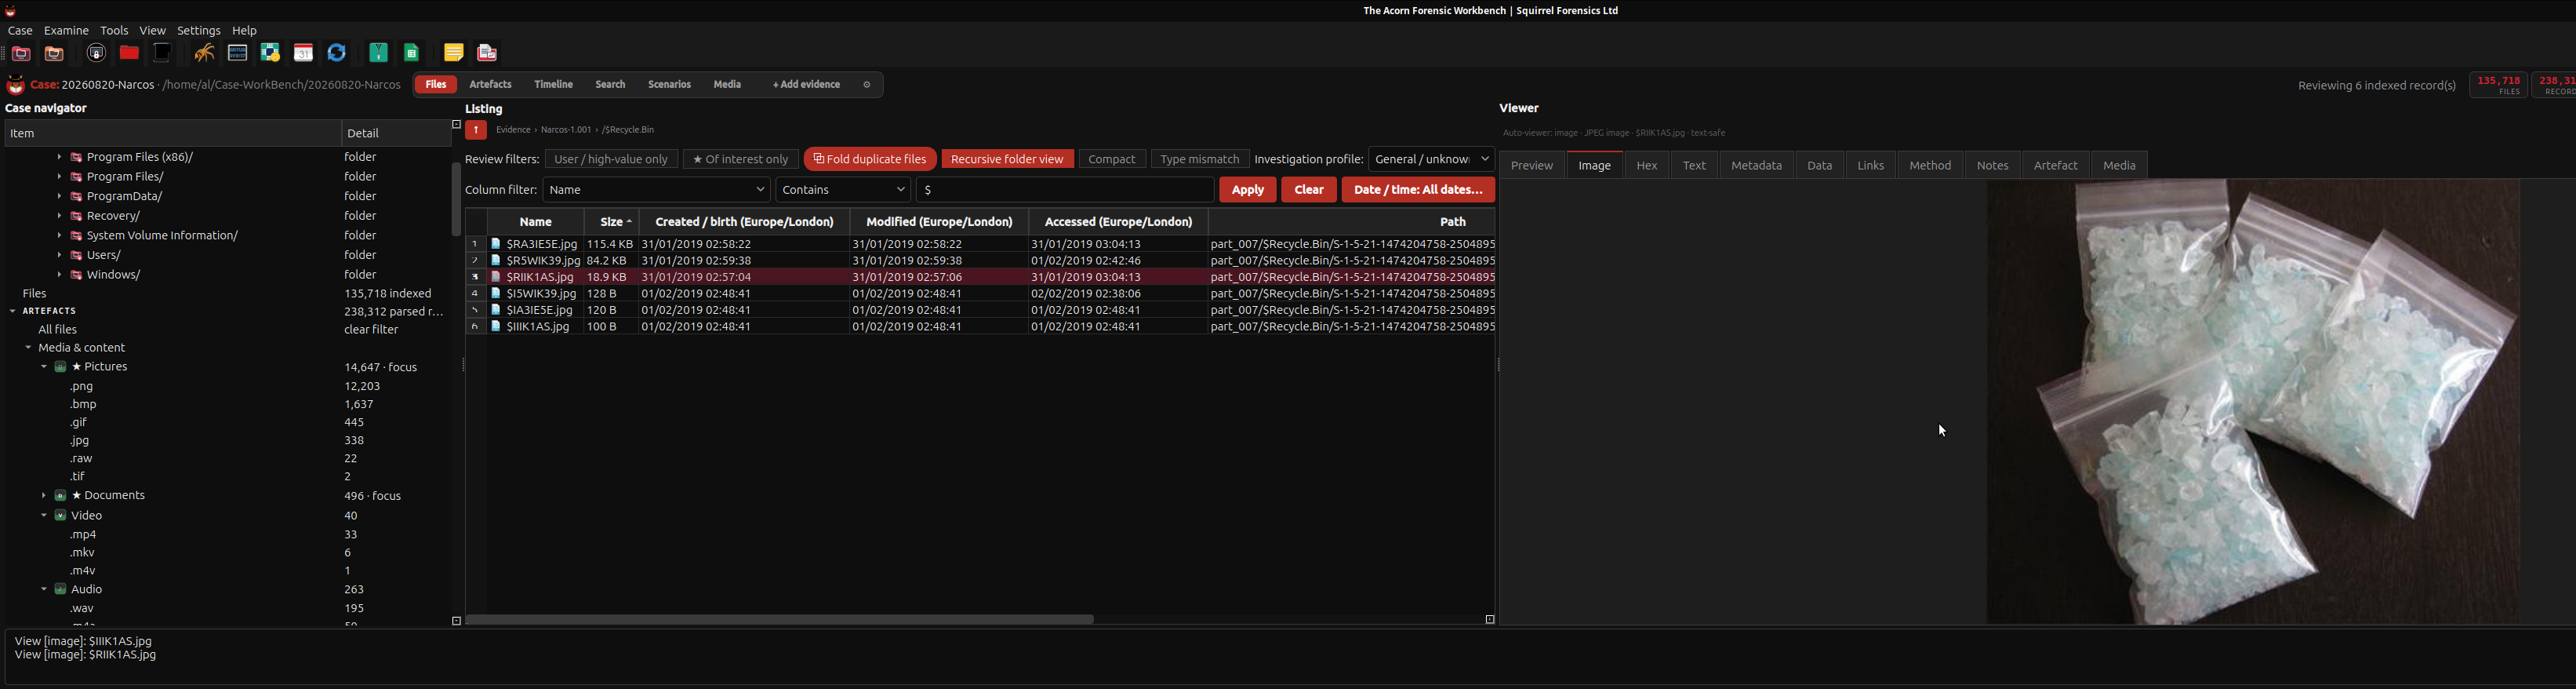
A recovered photograph is worth more when you can check where it came from. In this public Narcos teaching example, Workbench puts the photograph beside its file records. The image alone cannot identify the pictured substance.
Public training example · earlier interface
 View full screen
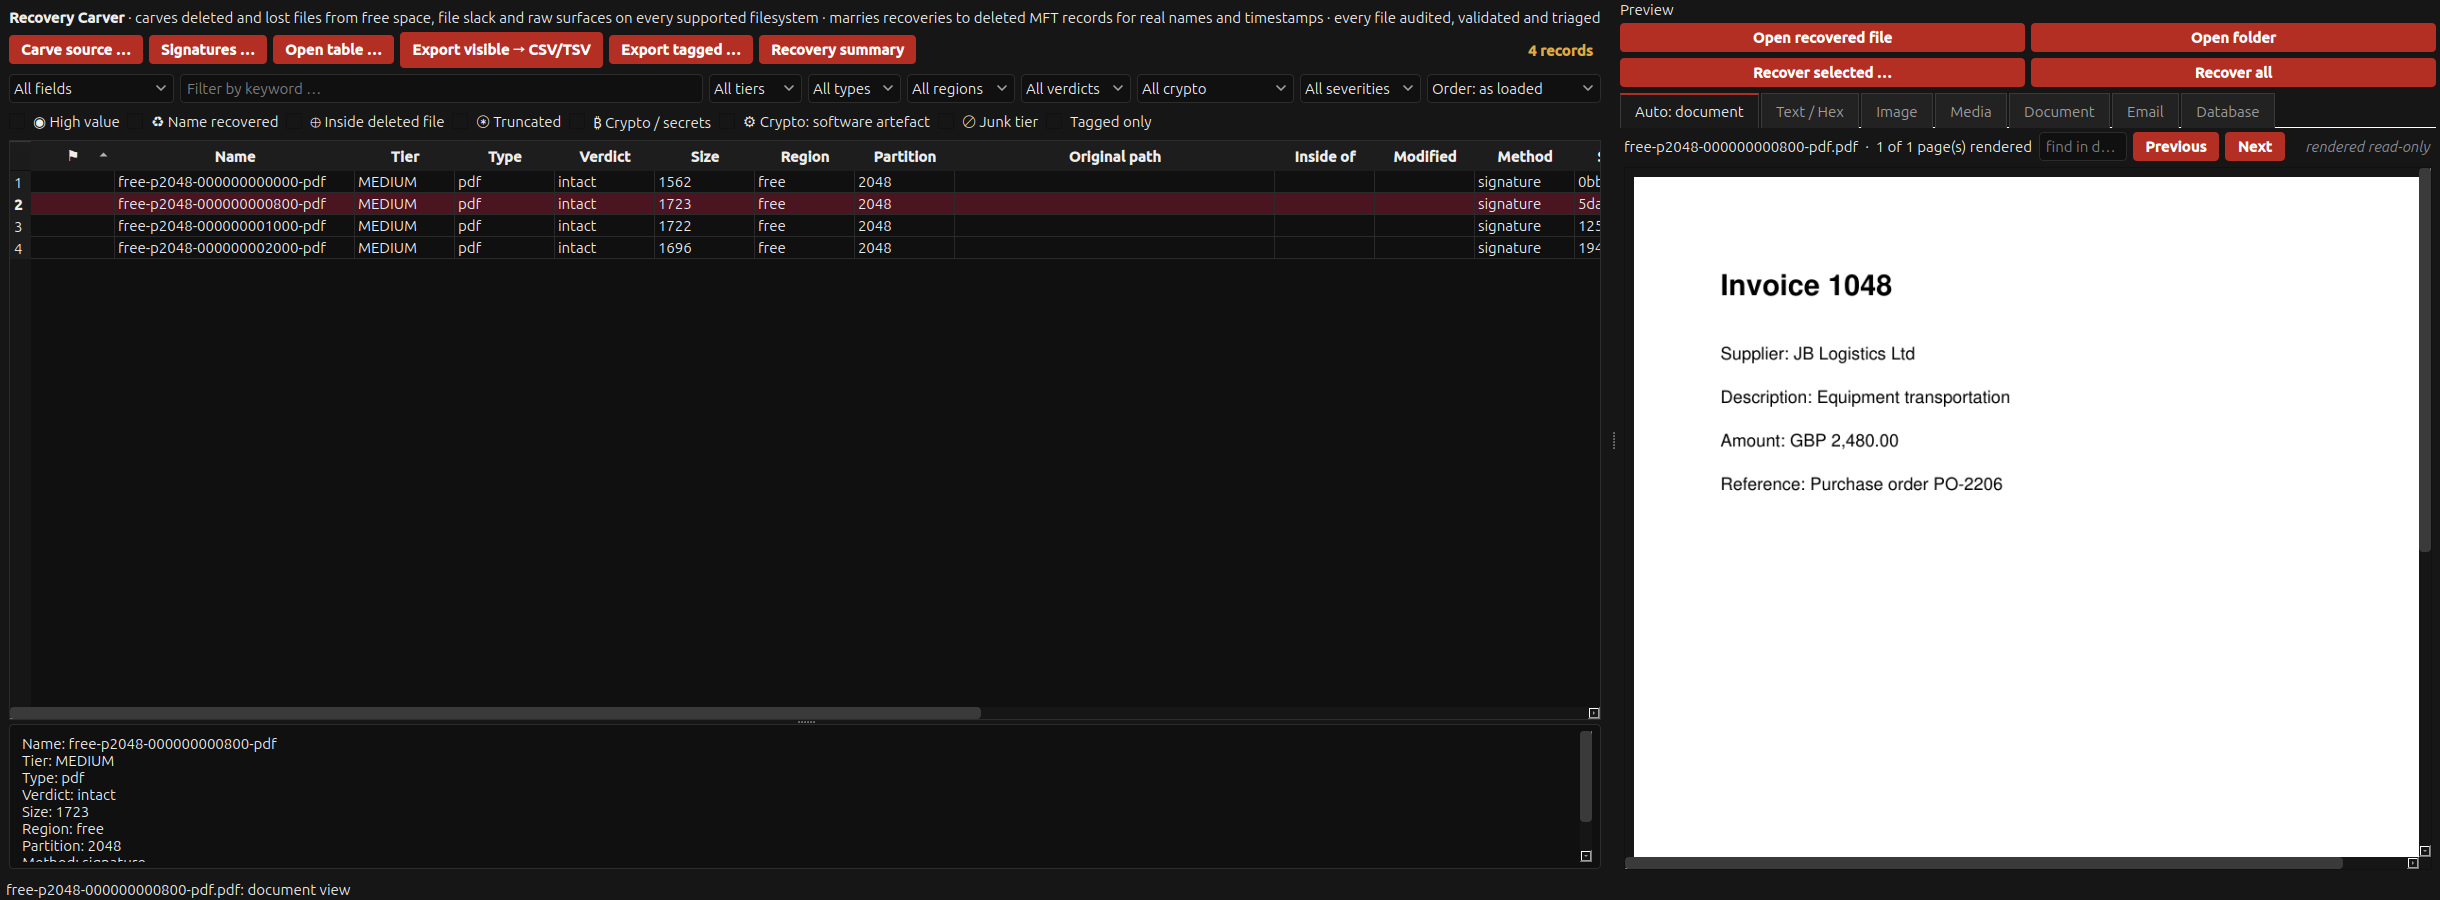
A quick format left four PDF structures in an owned FAT16 training image. Recovery Carver found them in free space. The recovered files were then checked against the originals, including where each PDF ended.
Constructed test example
 View full screen
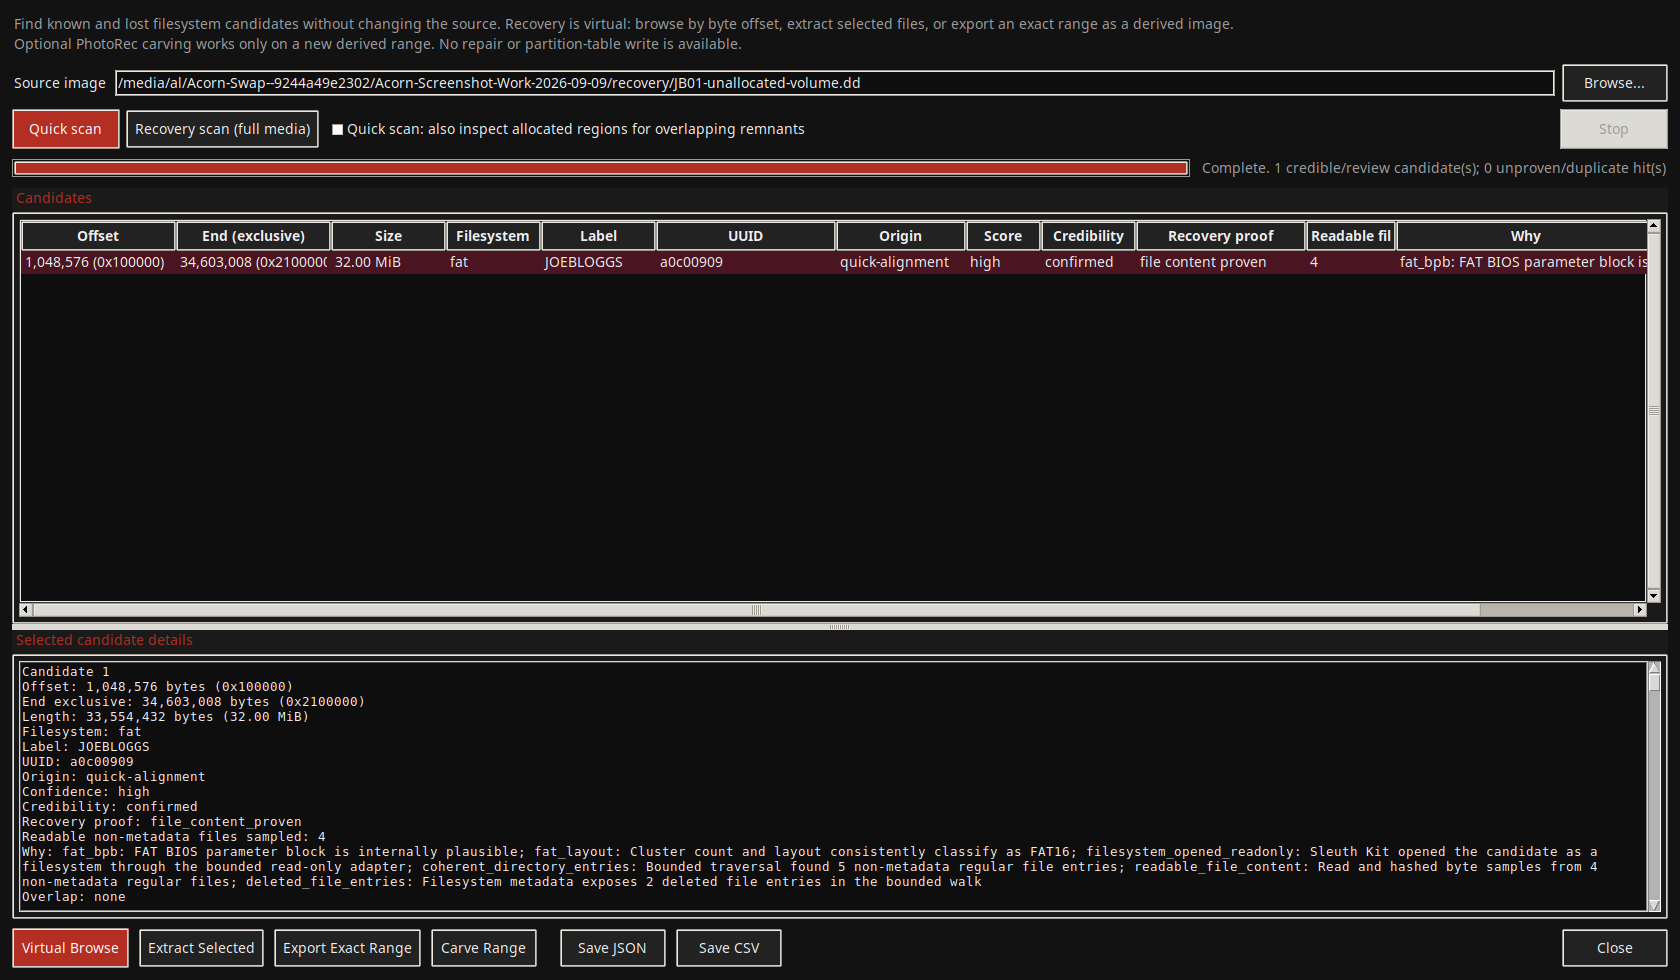
The training image has no partition table, but its FAT16 volume survives. The scanner finds that volume at byte offset 1048576. Selected files recovered from it match their reference hashes.
Constructed test example
 View full screen
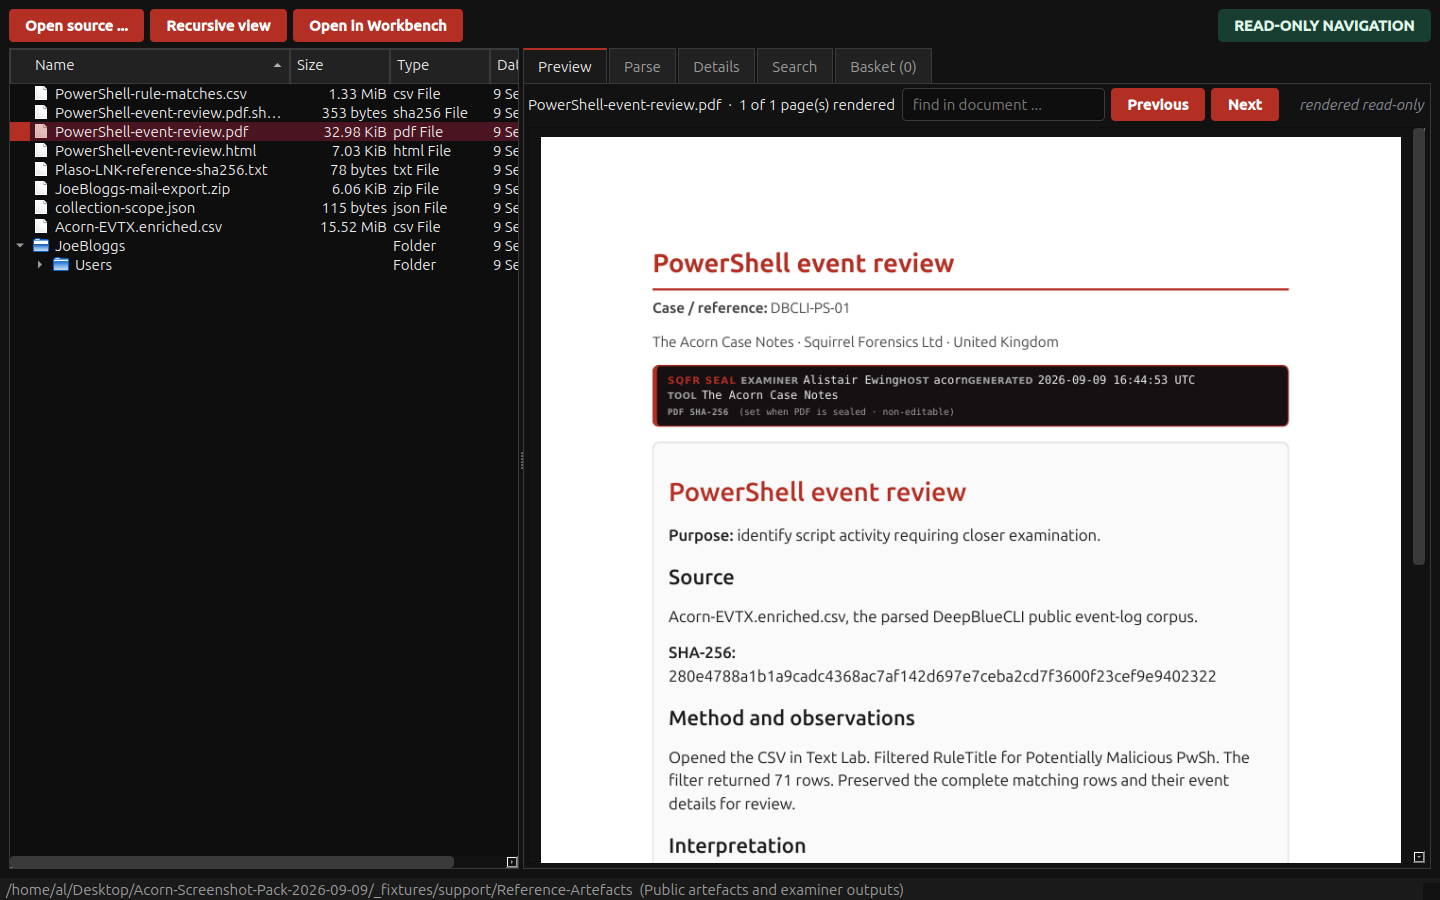
Navigator previews a Case Notes PDF beside the event-log export and reference files used for the work. The PDF is an examiner-produced report, not a document recovered from the investigated computer.
Public training example
 View full screen
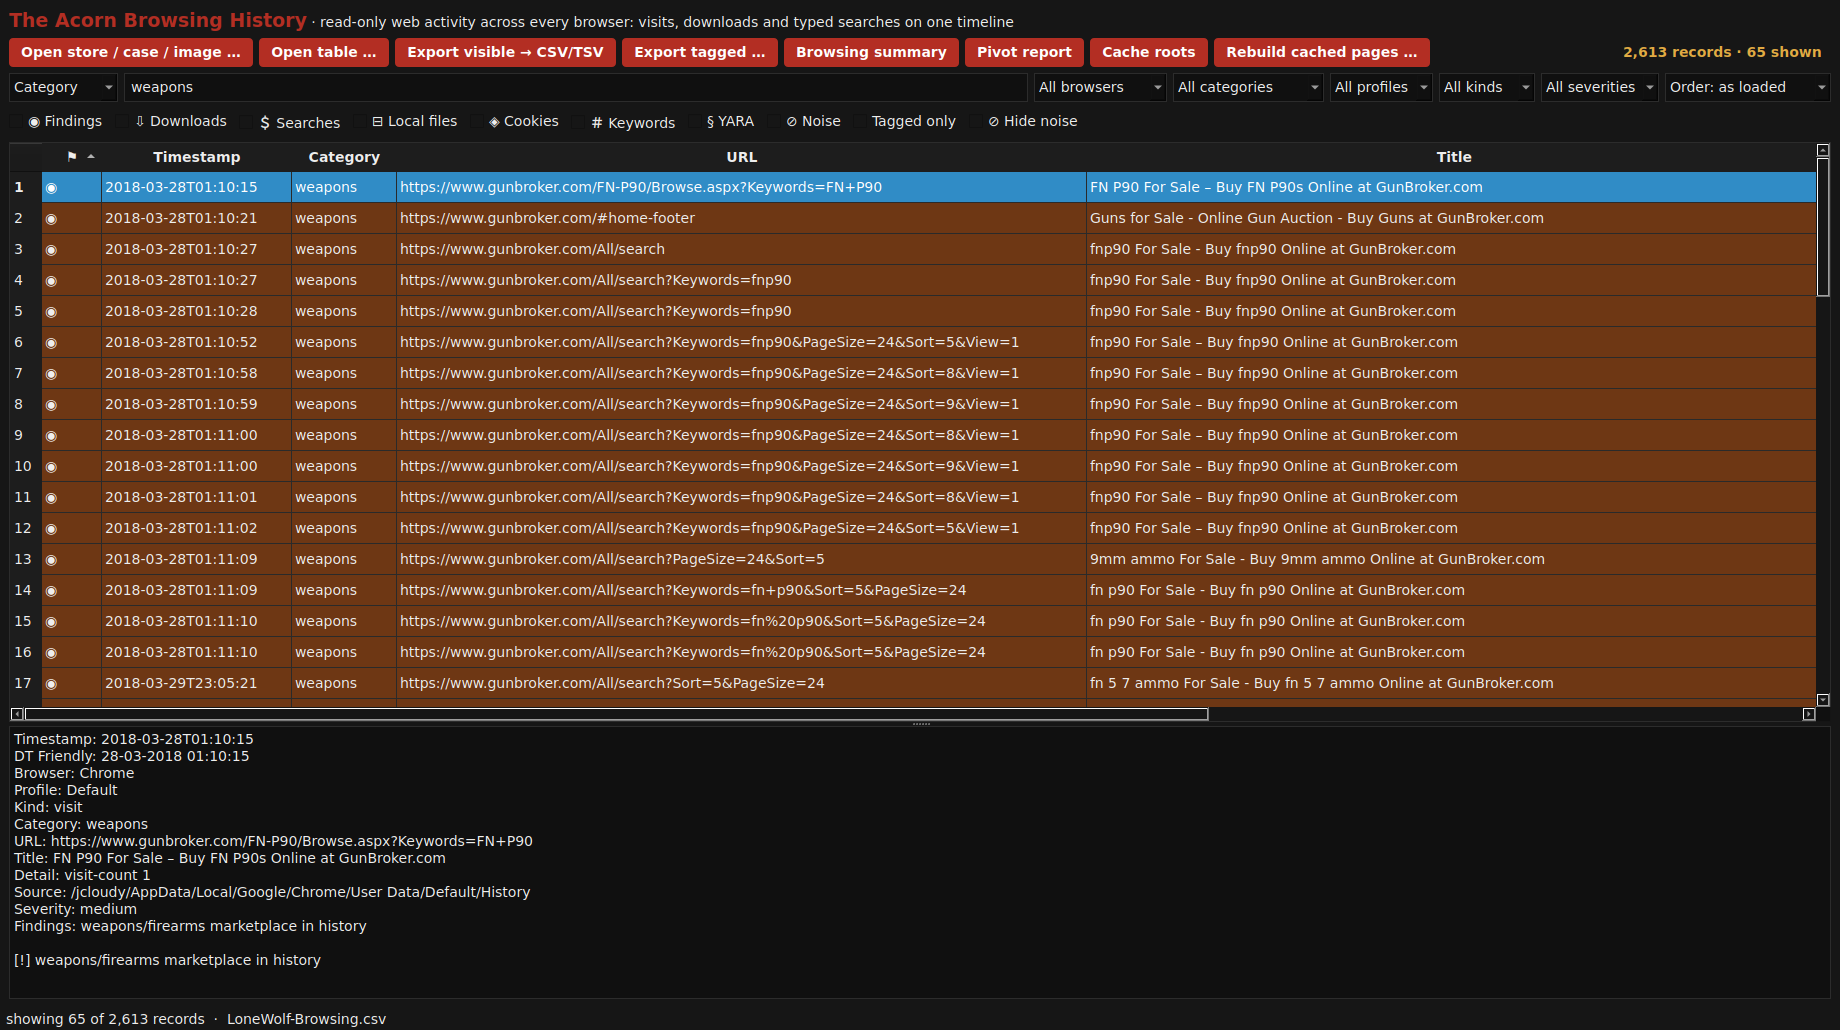
A category filter picks out 65 firearm-marketplace records from the public Lone Wolf training data. Review the page titles, recorded times and source URLs together. A visit alone does not show a purchase or identify the user.
Public training example
 View full screen
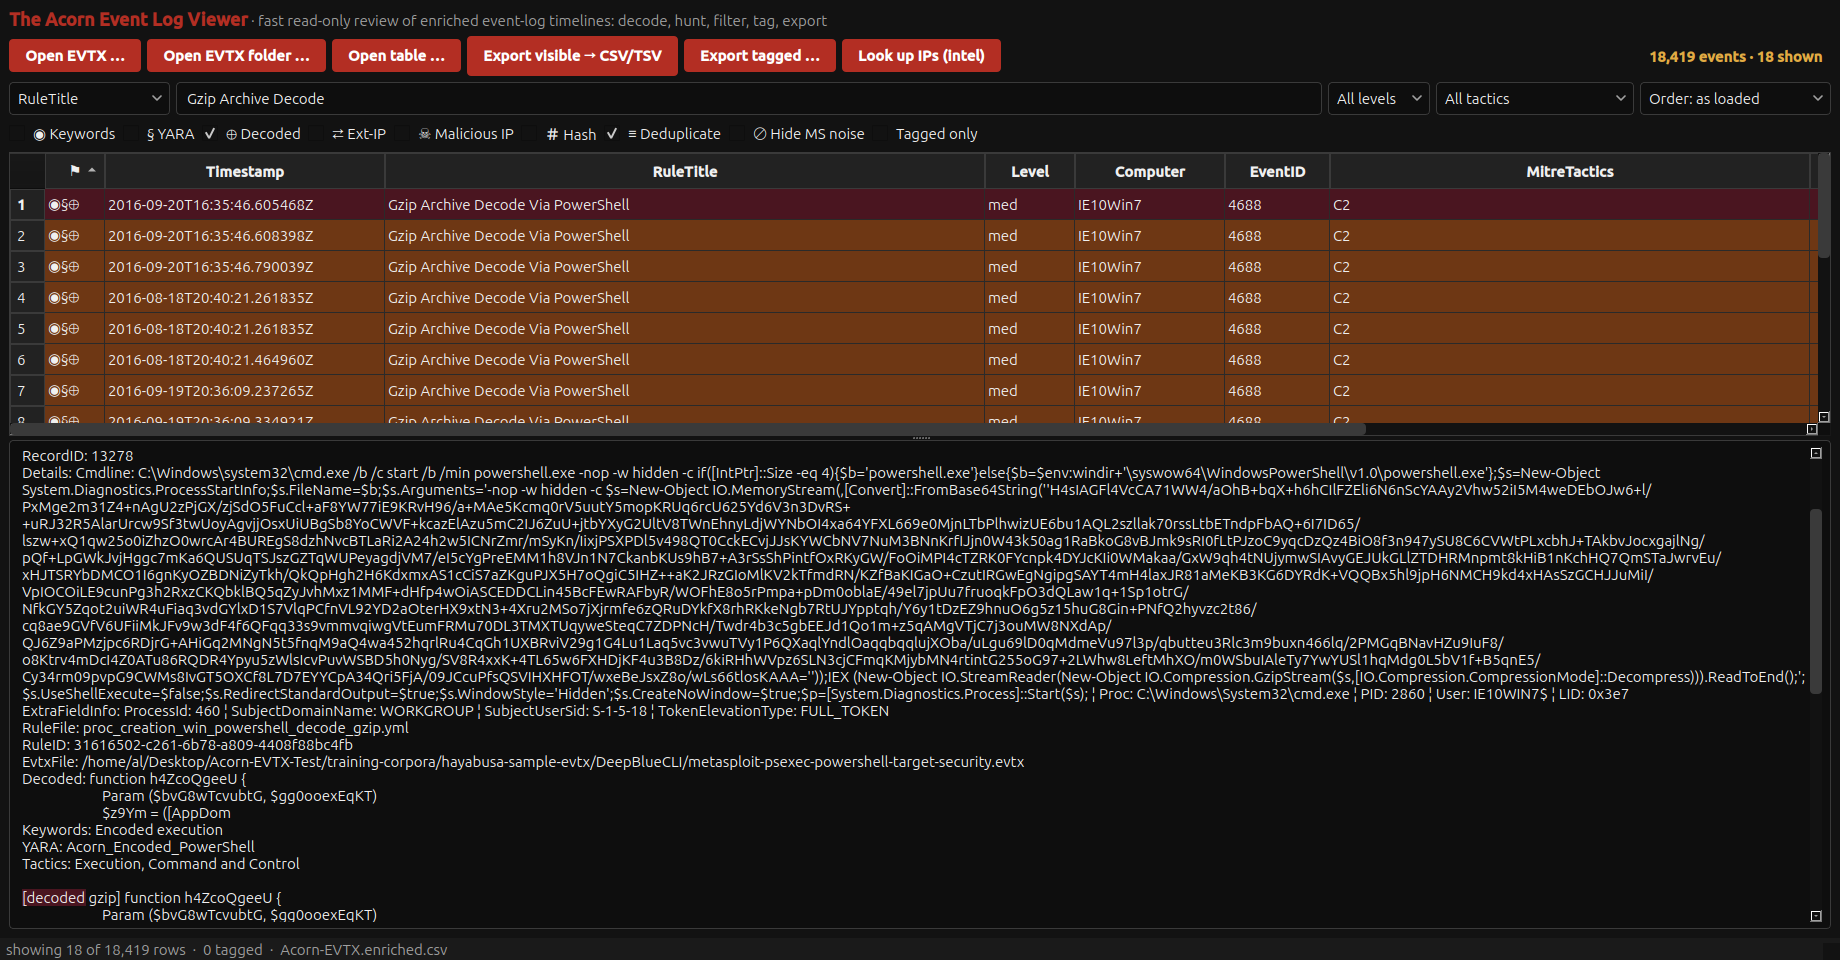
Eighteen rule matches flag archive-decoding commands in public training logs. The selected view puts the encoded command beside a decoded gzip script fragment. Review the source event and repeated matches before counting distinct actions.
Public training example
 View full screen
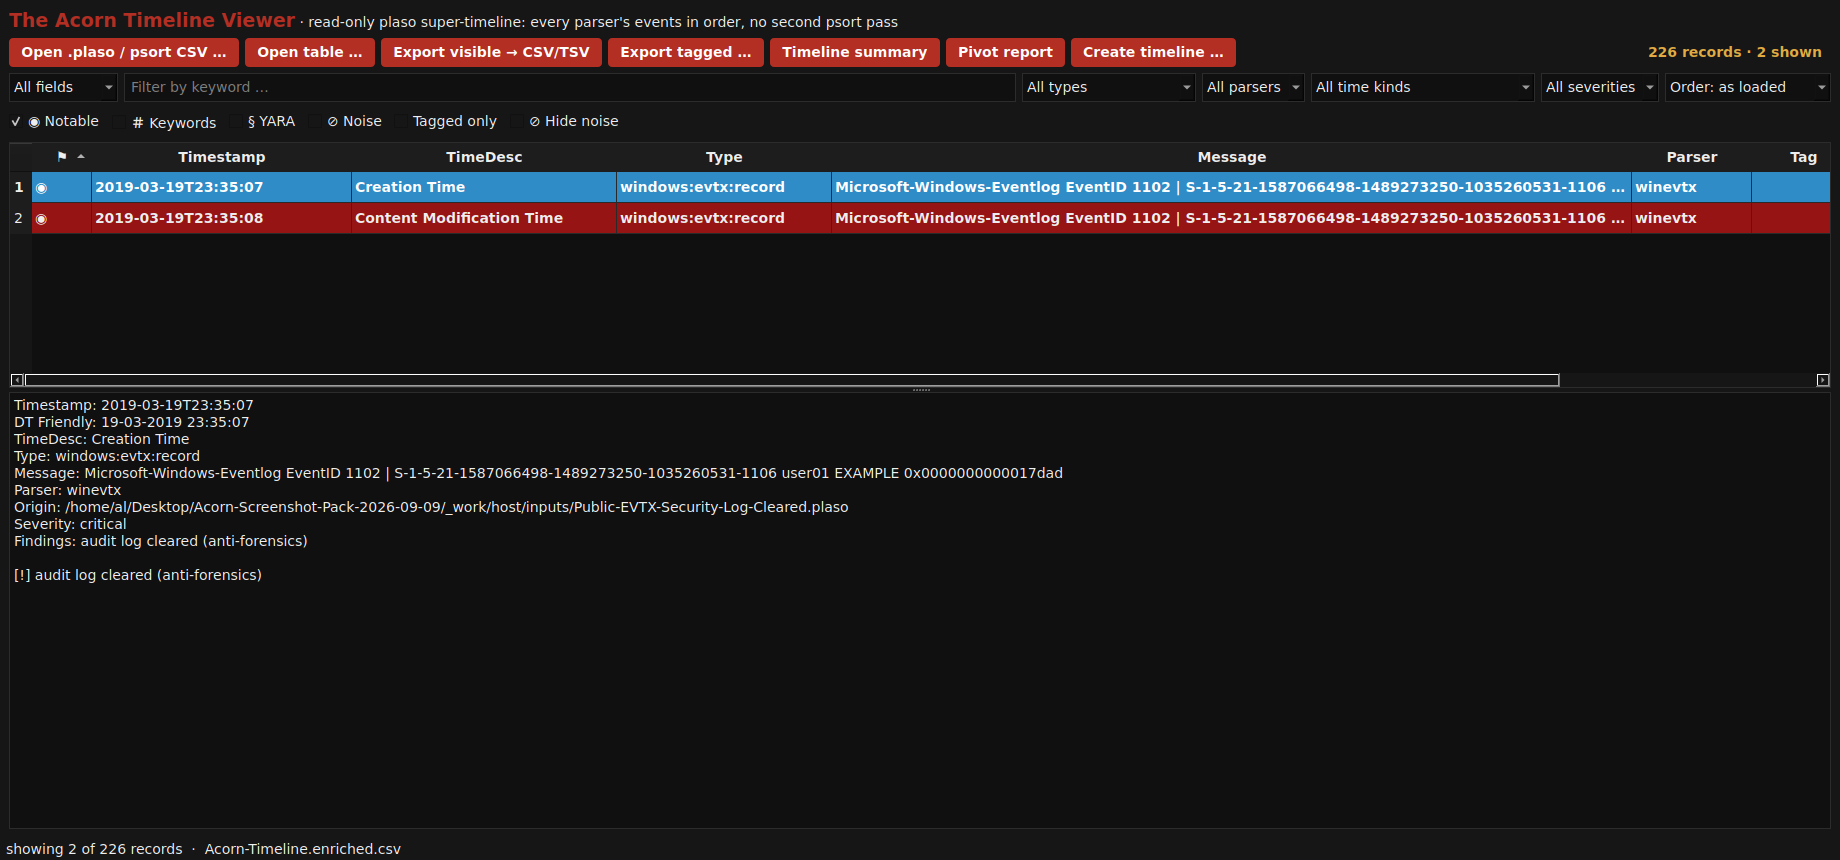
An audit log has been cleared. Filtering 226 public training rows reveals two timestamp entries for Windows Security Event 1102. They describe one event, not two actions. Check the recorded account and surrounding activity before explaining the clearing.
Public training example
 View full screen
Check each guide’s example and the technical support guide for the relevant build, inputs and limits.
Browse the Application CatalogueInside the examination
The Acorn brings the tools together. You link the findings to the case, check the context and decide what needs a closer look.
What can the files and records tell you? Set the source, date range and limits of your permission before choosing a tool.
Follow the path, file or event. Keep its source reference and recorded time beside the item you review.
Open the item, compare related records and test other explanations. A picture, page visit or search hit is a lead, not the whole answer.
Record what you checked, what it shows and what is still unclear. Keep enough detail for another examiner to review your work.
View full screen
The photograph was recovered in the public Narcos teaching scenario. Workbench shows it beside Recycle Bin entries, so you can examine the file records as well as the picture.
To investigate deletion, check the matching Recycle Bin metadata. The photograph’s modification time describes a different event. Compare both with other activity on the device.
Earlier supplied Workbench interface, using the public Narcos teaching scenario. Select the screen, then choose “View actual size” to inspect the records.
Illustrative training record, separate from the Narcos capture
Read the deletion time from the matching Recycle Bin metadata. File created, modified and accessed times answer different questions. Record the time zone and compare related activity.
From file to finding
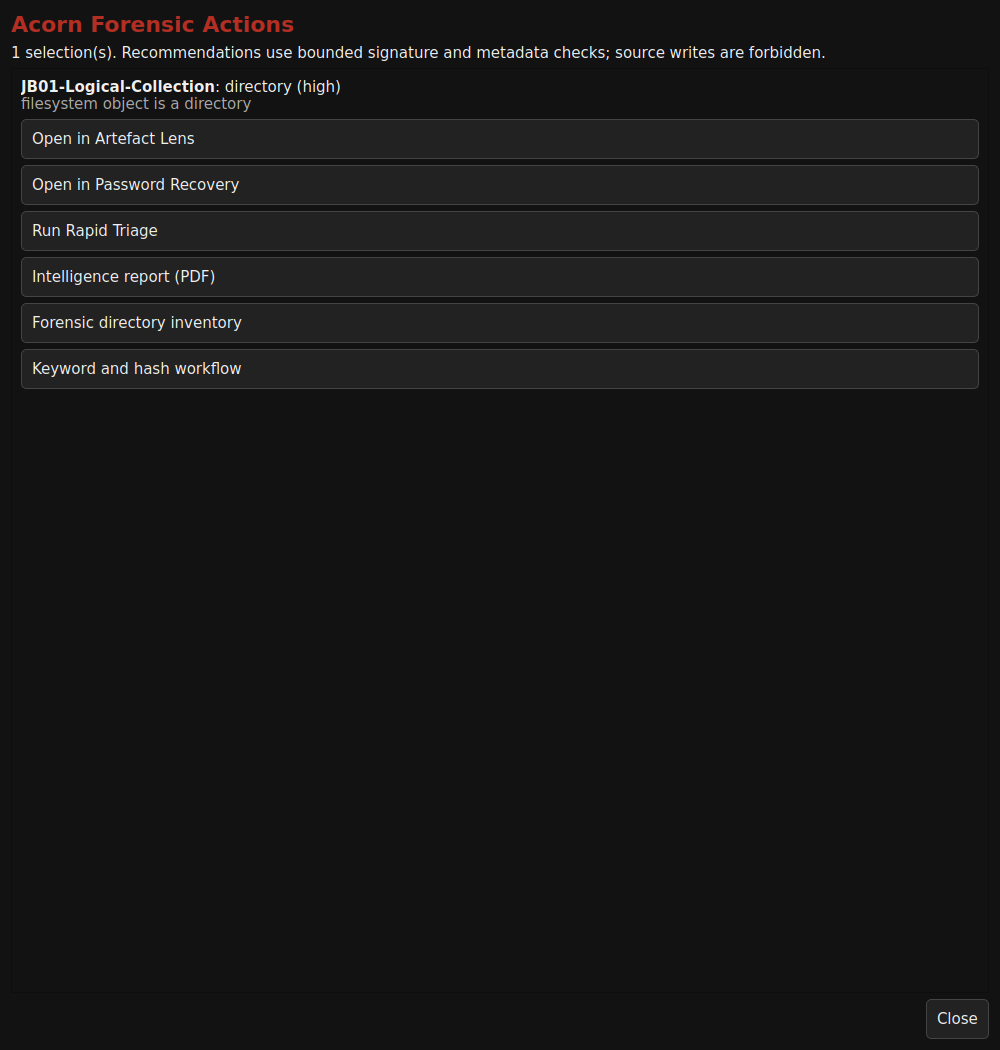
A suspect PDF arrives by email. Check what the file contains, then choose the next step. The visible page is only part of the story.
Try Actions, or right-click the example file.
Illustration only. No file is analysed in your browser. Available actions depend on the file and Acorn build.
 View original screenshot
Three training screenshots show the reporting steps. Playback timing is illustrative, not a processing benchmark.
Download the animated walkthrough (GIF)Triage an item with a right click
Right-click an item and open Artefact Lens. It checks the file's contents, not just its name, and points you towards a suitable tool.
Recognised file and record types include:
Recognition is a first check, not a completed examination. Parsing and reports depend on the file and installed tools. Check the supported workflows.
In the 2013 MiniDuke attacks, a convincing PDF concealed malicious code. Explore the historical example to see why the visible page is only part of the story.
A finding is a lead, not a verdict. Finding a suspect file does not prove it ran. Compare the file with device and email records.
Explore Acorn Malware Triage →Researchers found a malicious program concealed in the PDF. An exploit, code that abuses a software flaw, could install it through a vulnerable version of Adobe Reader.
Forensic question: Was the file merely present, or did it run?
The published analysis describes compressed JavaScript and an encoded payload inside the PDF. A dropped program contained both the backdoor and a harmless document to show the reader.
Forensic question: Which part of the file supports the finding?
ASEM_seminar.pdf is one of the samples named in the research. In a case, record the source path and file hash, a fingerprint used to check the file has not changed.
Next check: Compare the attachment, email and device records. Finding the PDF alone does not prove infection.
A workspace beyond the office
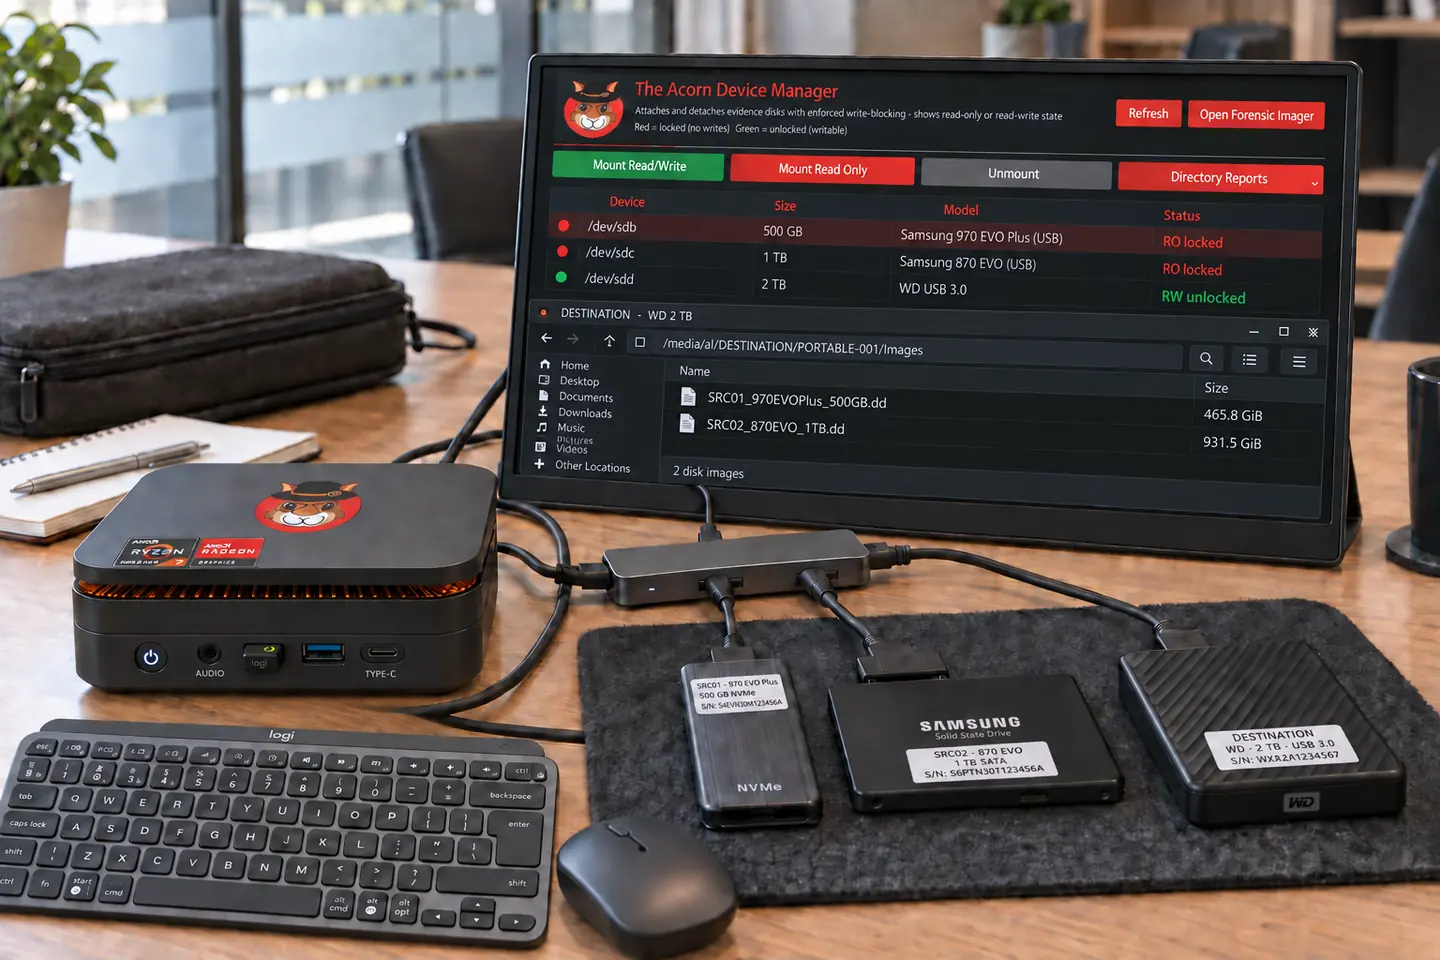
The planned kit combines a workstation, screen, keyboard and mouse. Choose a safe working area with suitable power and storage for the task.
 View full screen
Plan a temporary workspace around your permitted tasks, the power supply and the systems you need to examine.
View full screen
You still need suitable power, shelter from the weather and a safe place to handle the source.
Generated illustrations of the proposed hardware and working settings, not photographs of deployments. Connections, source adapters, power and environmental suitability must be checked for the actual task.
Explore the workstation and portable kitOne workspace. Field to desk.
Acquire on site. Review at your desk. Keep your case files and forensic tools in the same workspace.
The planned kit pairs a small workstation with a USB-C-powered screen, mini keyboard, mouse and carry bag. Plug into mains power on site, or plan an acquisition around a suitable rechargeable power station.
Target: 24 GB RAM · Ryzen Embedded, 6 cores / 12 threads · 1 TB PCIe SSD
Back at the desk, use a compatible USB-C dock for multiple screens, a full-size keyboard, mouse and external disks. Continue the review in Workbench, with focused tools close at hand.
The aim is a carry-bag kit rather than a workstation built into a full-size hard case. For scale, a Peli 1510 case measures 55.9 × 35.1 × 22.9 cm outside. The Acorn unit measures about 12.8 × 12.8 × 4.4 cm and weighs around 500 g. Its power supply, screen and other kit add to the packed size and weight.
The diagram is not to scale. A carry bag does not offer the same protection as a rated hard case.
Targeting late Q4 2026. Final hardware, price and compatibility will be confirmed before orders open. No deposit is taken here.
Connect the source, check write protection and choose separate storage for the image. With a suitable mains socket and adaptor, there is no battery countdown.
Keep power stable for the whole acquisition. Local evidence analysis runs on the workstation; cloud collection and remote sessions need a network.
As a planning example, a 512 Wh battery could supply a 100 W setup for about 4.1 hours, assuming 80% usable energy. This is not a measured Acorn runtime.
Capacity in watt-hours × 0.8 ÷ total load in watts. The 80% figure is a planning assumption, not a battery test. Include the computer, screen, disks and adaptors. Measure your full setup and allow extra reserve.
At an assumed 100 W: 256 Wh gives about 2.0 hours; 1,024 Wh gives about 8.2 hours. Temperature, battery condition and power losses change the result. See the runtime calculation method.
Use a suitably rated AC power station and the correct workstation adaptor. A USB phone power bank is not a confirmed power source. Battery packs are not part of the stated bundle.
Work in a parked vehicle with the equipment secured. Check the power station's vehicle-charging requirements; do not rely on a starter battery for a long acquisition.
Carry the kit in a bag, then take it out to work. Keep vents clear and use a stable, ventilated surface. Do not run the workstation or power station inside a closed bag.
A compatible USB-C dock can bring your screens and desk peripherals together. Spread the review across multiple displays, with external disks within reach.
*Video output, display count and Linux dock support depend on the final hardware. USB-C alone does not guarantee video or charging; separate workstation power may be needed.
Check the workstation's video-capable port, the dock, cables and display limits. Validate evidence connections and write protection separately: a dock is not a write blocker. Use suitable direct connections where your acquisition workflow needs them.
Discuss your workflow
Tell us about the evidence you handle and the work you need to do. We can demonstrate the relevant tools and discuss a setup for your team.